3D Printing Troubleshooting: Solving Z-Binding Issues for Smooth Prints
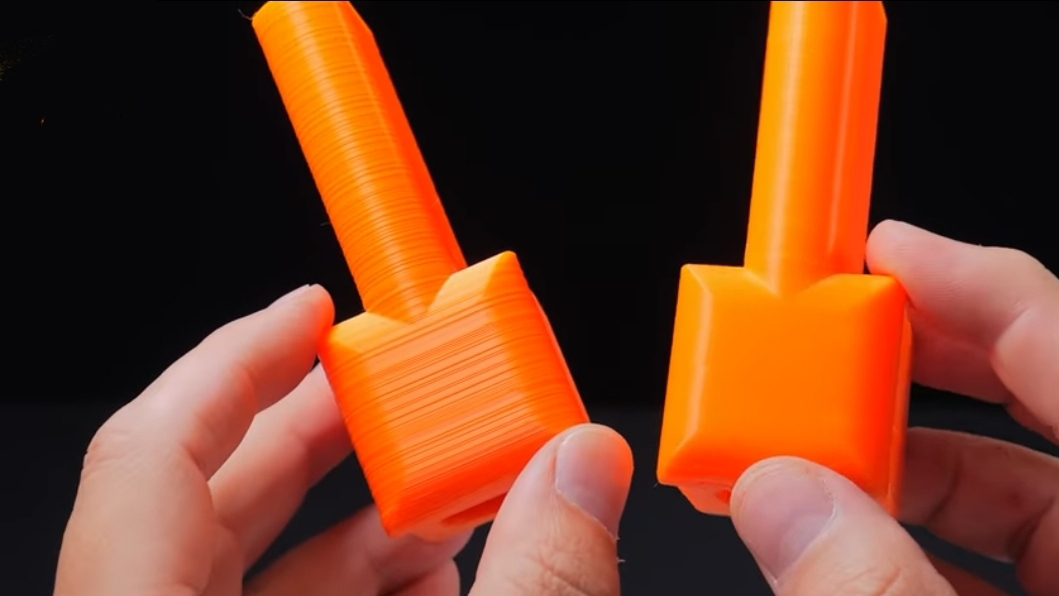
When using two popular 3D printers, you might encounter an issue where one print is perfect and smooth, while the other has noticeable lines from bottom to top. This problem can often be felt by running your fingers along the surface of the print. Let's explore what might be causing this and how to fix it.
Pause the video and share your guess in the comments before we proceed. You'll also notice a book featured throughout the video, which we'll discuss later.
Both parts were printed using PETG filament, although PLA would also work. The material isn't crucial. The parts are functional, designed in Fusion 360, and hold metal rails to the ceiling for studio lights. These parts aren't load-bearing; they are compressed by nuts, with the actual weight supported by stainless steel rods anchored to the ceiling.
I needed four of these parts, so I used two printers: an Ender 3 S1 Pro and an Elegoo Neptune 3 Pro. Both printers had been performing flawlessly for months, so I was surprised when one produced a flawed print. This printer had produced a perfect print just a week before.
Common Misconceptions
Is it wet filament?
No, it’s not. While drying filament is important, both printers were using recently dried filament, ruling out moisture issues.
Is it mechanical issues?
I checked for loose components like the bed, belts, gantry, and print head. Everything was tight and moving smoothly.
Is it temperature fluctuation?
I conducted PID tuning for both the nozzle and print bed to maintain a constant temperature. Despite this, the problem persisted.
Identifying the Problem
The layers were so irregular that I suspected a mechanical issue. By comparing the flawed prints side-by-side, I noticed identical line patterns, suggesting the problem was mechanical rather than temperature-related.
The Real Issue: Z-Binding
The problem was with the Z-rods. Specifically, the lead screw nuts were too tight. Although the printer worked fine initially, over time, the tight nuts caused Z-binding. This issue isn’t directly mentioned in many 3D printing guides but is well-known in the community.
The Fix
I loosened the lead screw nuts slightly, allowing them to move more freely. This resolved the Z-binding, and the next print was flawless. Here’s how you can do it:
1. Check the lead screw nuts on your Z-rods. They should not be too tight.
2. Loosen the nuts a few turns so they can move sideways freely.
3. Lubricate the Z-rods to ensure smooth movement.
Final Thoughts
Z-binding can occur on any printer, even if the lead screws appear straight. Regular maintenance and adjustments are crucial for consistent print quality. While my Ender 3 S1 Pro had no issues initially, over time, lack of lubrication and tight nuts led to the problem.
For new 3D printer owners, I highly recommend "3D Printing Failures" by Sean Aranda. It covers many common issues and solutions. Although it doesn’t mention Z-binding, it provides valuable insights and troubleshooting tips.


Comments
Post a Comment